Guide and solution of common problems in Linux.
Warning:
this guide is a work in progress and could be change over time, it is made with the intention of helping, without taking responsibility for damages and losses that occurred during the execution of any of these processes, it is advisable to consult a qualified technician and make external backups of all the information contained in your computer
Note that VCV Rack has been released recently, and it is impossible for developers to test it in all possible environments and situations, therefore it is natural for bugs and all kinds of problems to appear at this stage.
This is a guide that works for most Debian-based Linux distributions (like Ubuntu ), assuming a standard configuration, depending on your distribution some parts of the process may change.
Some operating systems (Ubuntu studio among others) are preconfigured in the way in this guide and can then jump directly to Jack configuration
for an official reference visit the VCV Rack manual
VCV RACK
The VCV Rack is a open-source Eurorack modular synthesizer simulator, it requires a lot of processing, pushing the processor to limits similar to a modern AAA video game.
This is why sometimes you can experience sound interruptions, high processor temperatures, high power consumption, etc.
System requirements
Modern Linux distribution (like Ubuntu 16.04+)
CPU: Intel / AMD 64-bit processor with SSE4.2 support (2011 or higher)
Graphics: dedicated Nvidia / AMD graphics card from year 2013 or higher with recent drivers
Integrated graphics like Intel HD are not recommended and can cause a significant increase in CPU usage.
Memora Ram: 1GB
Hard Drive: 1 GB of space
Requirements for DAW (Rack 2 Pro only)
additional to the previous requirements
VST 2.x 64-bit support
Supported DAWs: Bitwig 4, Reaper 6, Mixbus 6
Rack 2 plugin versions require a DAW with VST support
Setting up the operating system
Depending on the capacity of your computer, it can support jobs that require a lot of processing, but with the exception of some distributions (such as Ubuntu studio for example) the kernel is not capable of performing tasks in real time.
Installing a low latency kernel
Open a terminal and type
sudo apt install linux-lowlatency
Install Jack
Although ALSA may work fine, Jack is recommended
Jack is a sound server or daemon that provides low latency connection between jackified applications, for audio and MIDI data.
sudo apt install jackd2 qjackctl
Configuring access to real time
For the latest version of VCV Rack it is not necessary to enable “real time” access from the program, however it is necessary for the user to have access to real time so that VCV Rack can run correctly.
Replace “username” in the code below with the username on your computer (see troubleshooting in the next section of the document )
sudo adduser username audio
Give the audio group access to real time by editing the file
/etc/security/limits.d/audio.conf
sudo gedit /etc/security/limits.d/audio.conf
Change the content of the file to these values:
@audio - rtprio 99

@audio - memlock unlimited

@audio - nice -19
Jack standard configuration
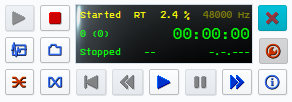
Open qjackctl by typing
qjackctl
(you can open it using Linux menu shortcut)
Press the setup button on the qjackctl interface, then display the “Drivers” menu and select ALSA
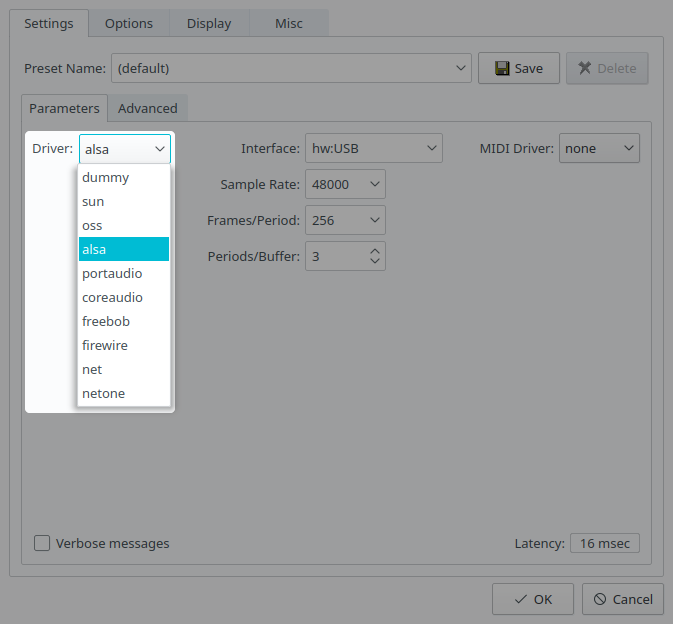
Open the “Interface” menu select your audio device

Now we will select the ideal values for the “Sample Rate”, “Frames / Period” and “Period / Buffer” finding the correct ratio will affect the performance, response and audio quality of your system.

…
This relationship is given by the following formula:

Here you can find a guide with the ideal relationship for audio interfaces
https://wiki.linuxaudio.org/wiki/list_of_jack_frame_period_settings_ideal_for_usb_interface
Finally check the Real time box, press OK and reboot the system.
CPU frequency scaling
Allows the operating system to raise or lower the CPU frequency to save power. CPU frequencies can be adjusted automatically depending on system load, in response to ACPI events, or manually by user space programs.
To order the processor to run at high performance, open a terminal and type:
echo performance | sudo tee / sys / devices / system / cpu / cpu * / cpufreq / scaling_governor
Operating system graphics
Some high-capacity computers do well to load the animations and effects from the desktop to 100%, in others it is necessary to take these characteristics to a minimum, to prevent the use of resources unnecessarily
Similarly, the use of lightweight desktop environments will help improve performance, like Xubuntu (XFCE) and Lubuntu ( LXDE)
Installing VCV Rack on Linux
Download the latest version of the software for Linux on the web, unzip the zip file in any location on your computer.
For the purposes of this guide we assume that you have downloaded the “Rack 2 Free” version and unzipped it in “/ home”
Running the VCV Rack with Jack
Close all unnecessary applications and run Qjackctl
Qjackctl
run VCV rack
cd Rack2Free /

./Rack
You can also run the VCV Rack by accessing the folder and double clicking on the Rack file.
Connecting the Rack
go to the audio module (if there is none, one is right clicking on an empty space in the Rack) and click on the “No Device” box and select Jack as Audio Driver
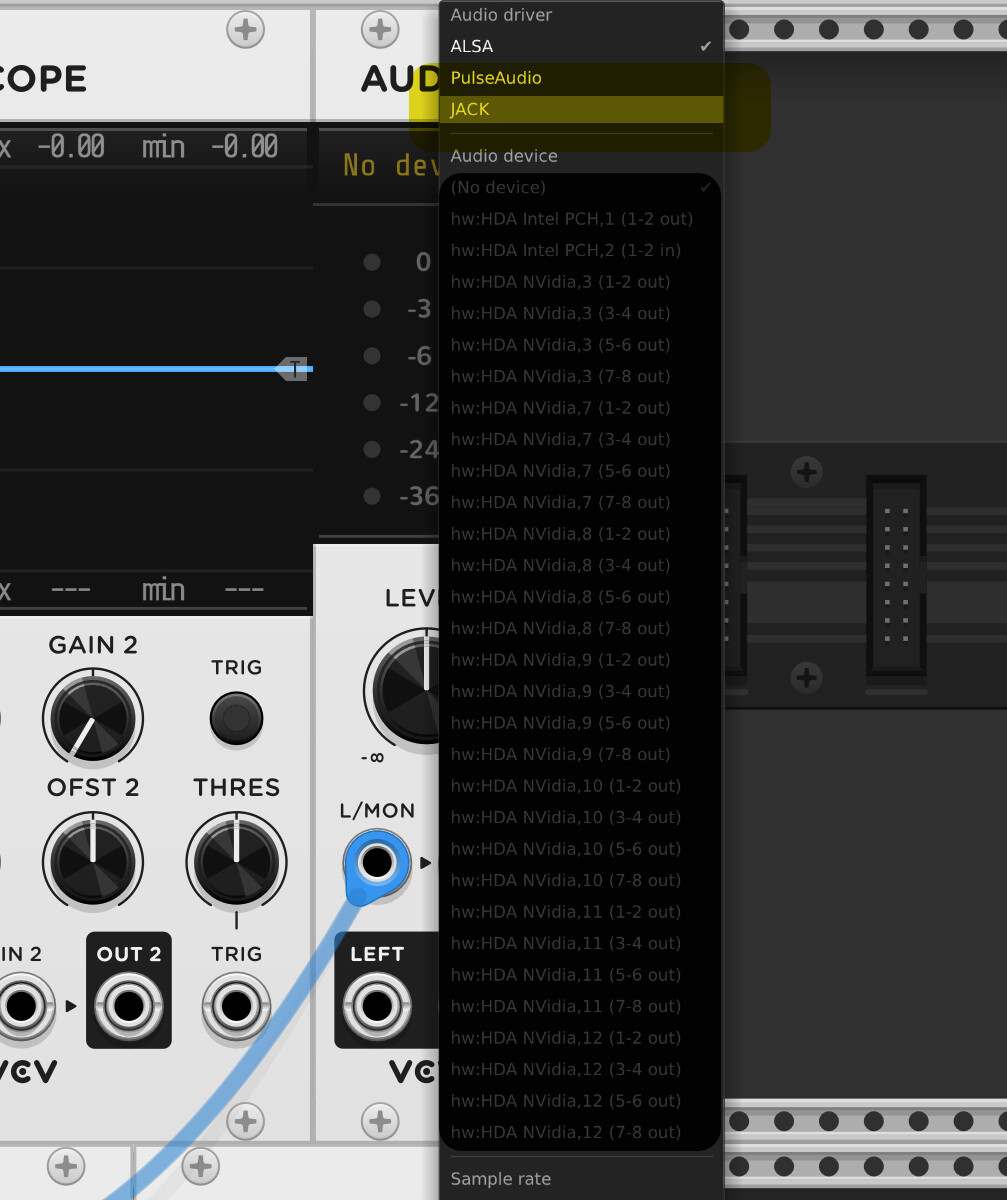
click again and select the Audio device

If all goes well, you should hear a clean, clear sound when you press the keys on your QWERTY keyboard.
Problem solving
1. I don’t hear any sound at all coming from the rack
Causes: This could be due to interruptions in the flow of the audio between the Rack and the output of the audio hardware.
Solutions:
- Make sure the speakers are turned on and connected
- Check that the volume levels are at an audible value in the ALSA mixer, open a terminal and type
alsamixer
- Disables the “Auto mute” function from the alsa mixer (this option cuts the sound of the audio output when headphones are connected)
- Press the “connections” button on the Qjackctl interface and make sure that there is a connection between the outputs of the VCV Rack and the physical output of the audio
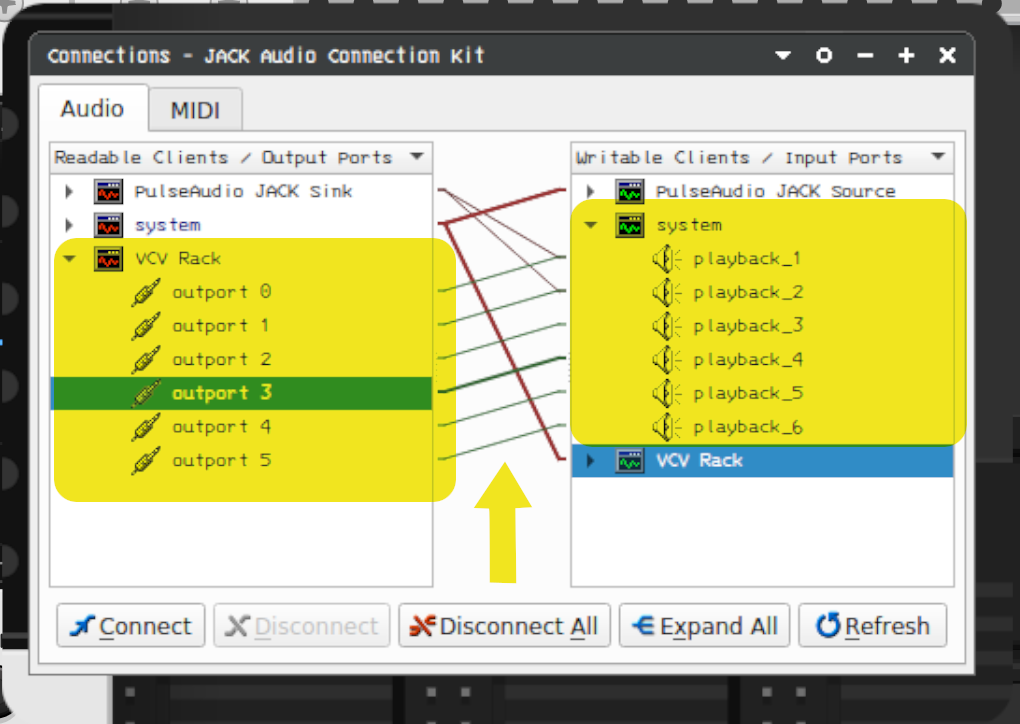
In case of no connection you can create it by clicking and dragging the outputs of the Rack to the outputs of the audio hardware, for this procedure you can use external LADISH that facilitate the administration of the connections Claudia has additional features, such as the ability to save and load “studies” as well as the option to render in real time and freewheel)
2 VCV rack freezes when saving or loading files
Causes:
Rack 2.0.4 switched its OS dialogs subsystem from using GTK3 to zenity
Solution
Make sure zenity is installed
sudo apt install zenity
2. I hear interruptions, noises, and artifacts in the audio
Causes:
this is due to incomplete processing, known as Xruns, there are several things that can be done to fix it
Solutions:
-
Perform the procedures cited in this guide, low latency kernel installation, Jack installation and configuration and CPU frequency scaling in performance
-
increases the size of the buffer, larger buffers give the processor more time to perform the calculations for sound synthesis, but they are detrimental to the response in real time, that is, they increase latency
-
Reduce the Sample rate, the sample is the number of samples to convert from analog to digital audio and vice versa, this is equivalent to the number of pixels in an image, larger samples offer higher sound quality, but increase the number of computations for such a conversion, 48khz is usually the setting that works best in most cases
-
Make sure that there is no Sample rate conversion between your audio device and the VCV rack, currently there is an “auto” option that matches the Rack sample rate with that of your audio device.
-
Increase the number of threads used for patch processing by one at a time until the artifacts disappear.
-
Press F3 (CPU meter) and find the modules that have the highest processing load
-
Some modules have options for high and low fidelity
-
Polyphony increases processing in direct relation to the number of voices.
-
Turn off CPU meter (F3) this feature has impact on processor usage
-
reduce video refresh rate
-
run the VCV Rack in full screen mode
-
Turn off non-vital features and functions of your computer, eg Bluetooth, WiFi.
-
Use a dedicated audio card instead of the integrated one
-
You may have reached the processing limit of your computer, in this case the only possible solution is to remove modules from your patch
3. How do I connect my QWERTY keyboard, MIDI keyboard, MIDI devices and video game controllers to the rack?
Consider that all devices send voltages that obey particular controlling standards. While the VCV Rack works using the Eurorack standard, so the main objective should be to convert these voltages to the Eurorack standard to be able to use it within the software.
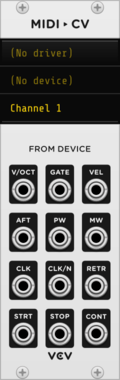
MIDI-CV module allows converting MIDI signals from different sources to Voltages with Eurorack specifications
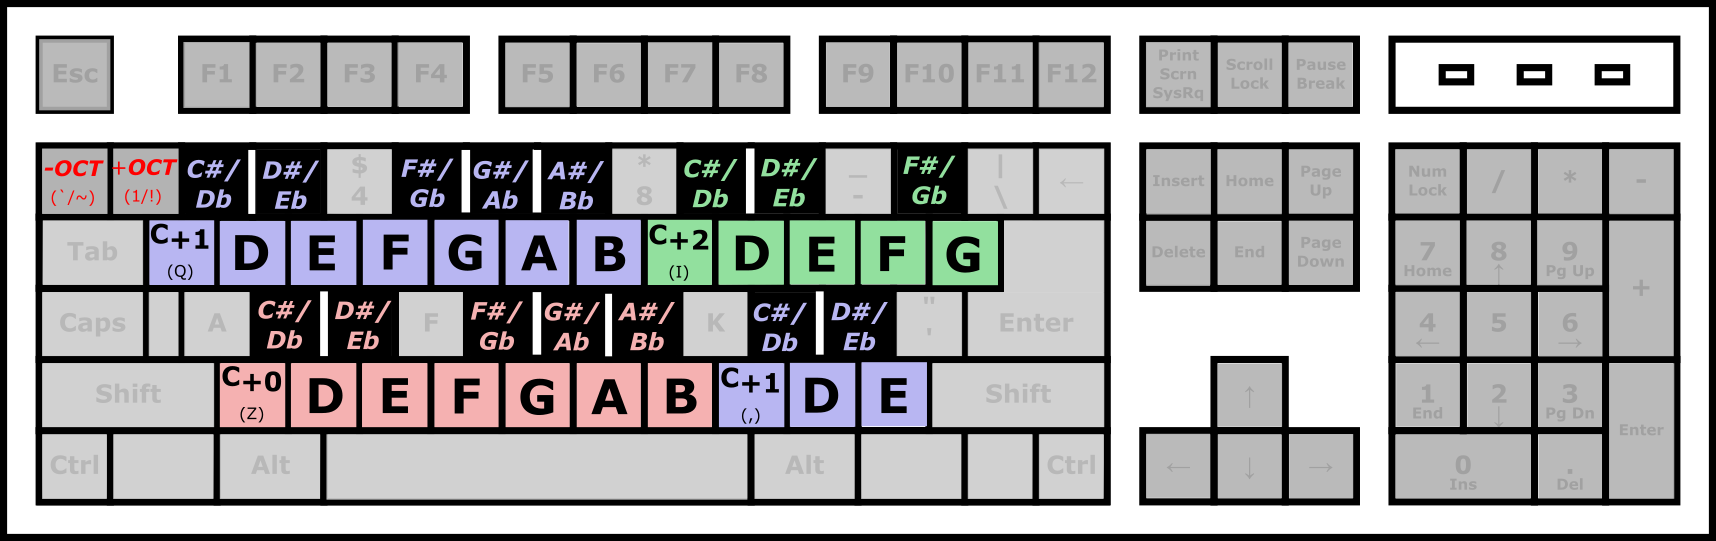
Connect the QWERTY keyboard as piano
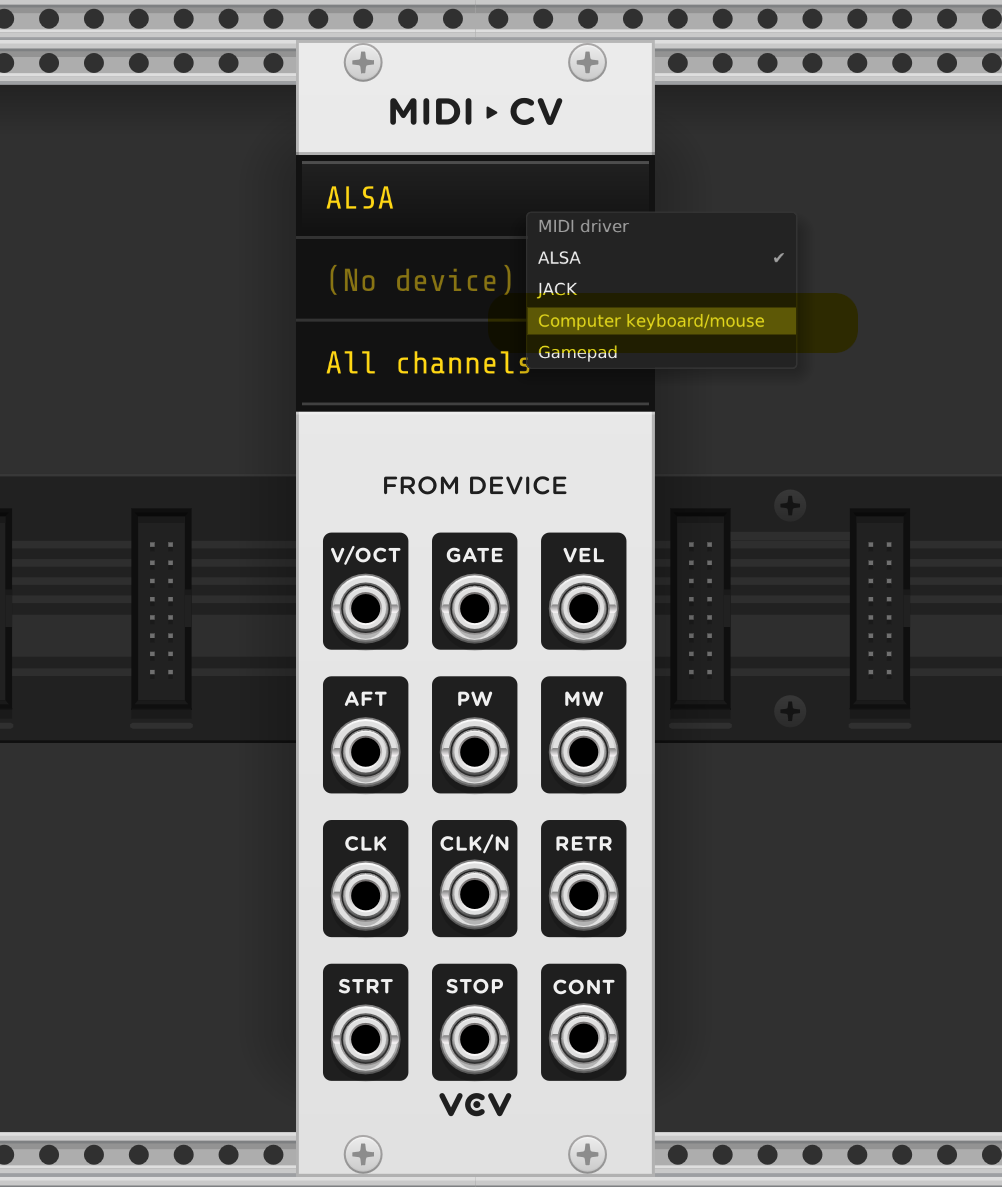
Add a MIDI-CV module to your Rack, in the MIDI Driver box select Computer Keyboard / mouse
in the MIDI Device box select QWERTY Keyboard
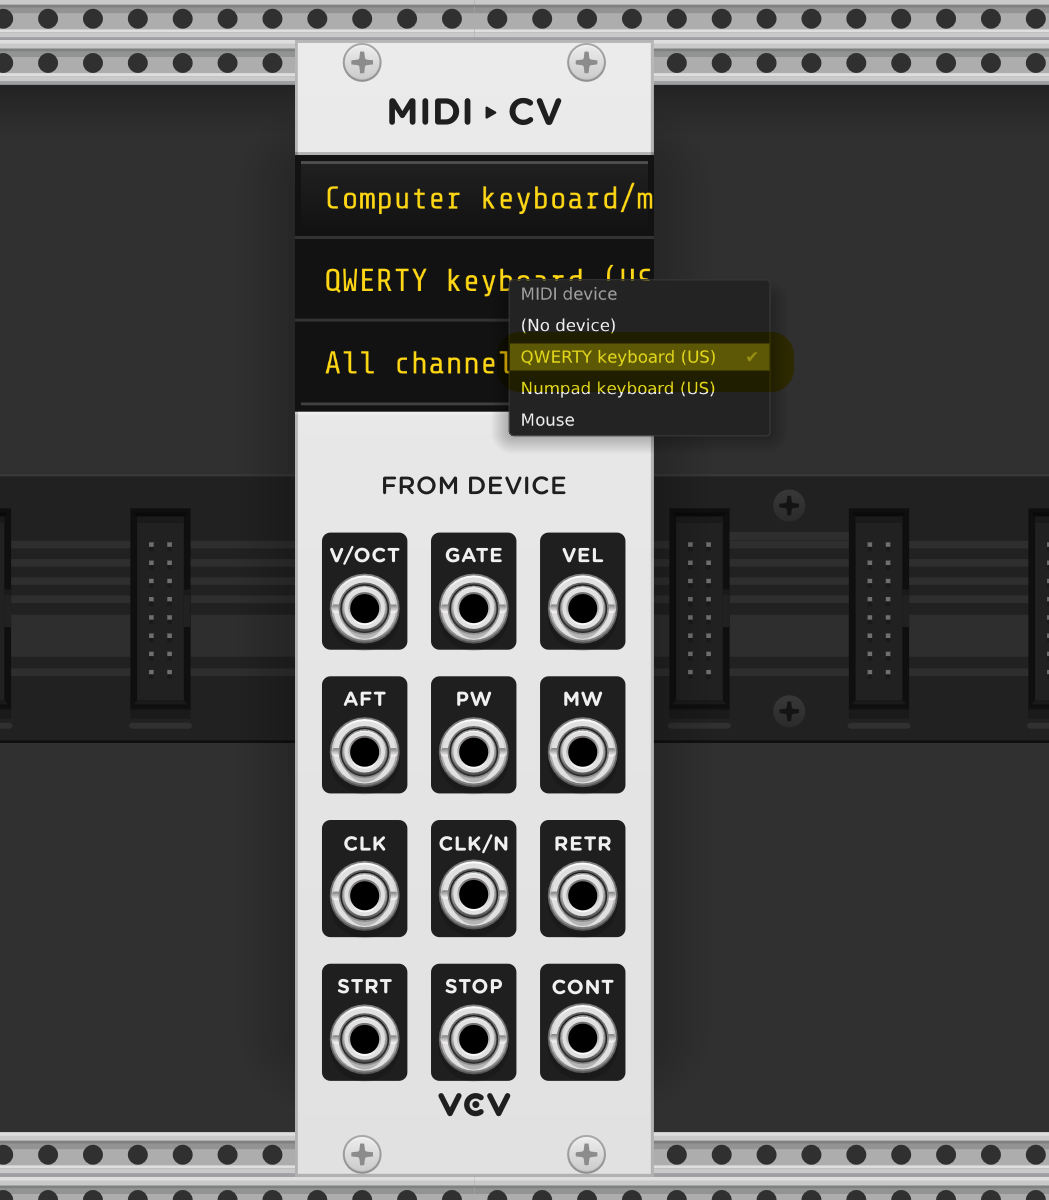
Finally select All Channels
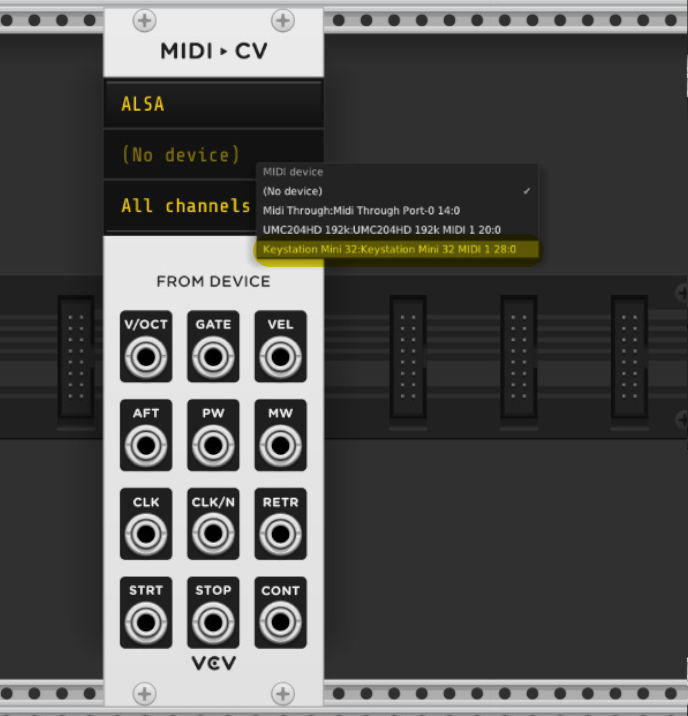
Connecting a USB-MIDI keyboard
Add a MIDI-CV module, in the “MIDI Driver” box select ALSA in the MIDI Device box select your device
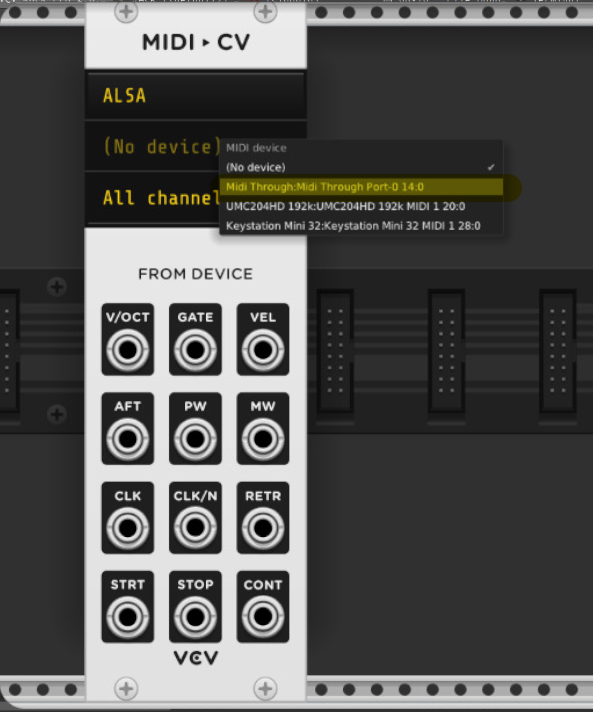
Connecting an external program via MIDI
Other DAWs and apps can also be connected to the Rack via MIDI
Add a MIDI-CV module, in the Driver box select ALSA, in the Device box select MIDI Through Port-0 and select the channel through which you want to receive the information
Go to the DAW or App you want to connect and select and match the settings above but this time on the MIDI Out
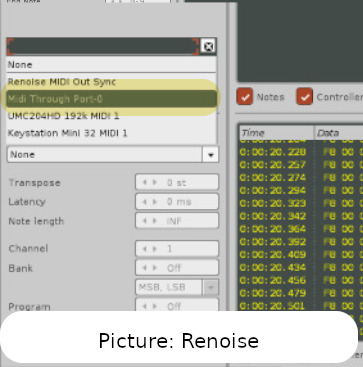
Make sure have match between the MIDI Out and IN channels
4. I don’t know what my “username” is to configure the real time access
effective username is the username under which the Bash process corresponding to the current session runs
type in a terminal
whoami
5 using Jack I can’t hear my other audio apps
Causes:
- applications are not configured to use Jack
- applications do not support Jack
Solutions:
-
make sure the application supports Jack and is configured to use it
-
In case the application does not support jack (e.g: Firefox), you may use the pulse audio module to connect the software with Jack. to install it open a terminal and type:
sudo apt install pulseaudio-module-jack
be sure to configure the application to use that module
6 System dialog opens behind the Rack windows (Open, Save)
Causes: the behavior of the system windows is configured to focus under the mouse
Solutions:
Disable the “focus is under the mouse” behavior in the windows setings
.-.-.-.-.-.-.-.-.-.-.-.-.-.-.-.-.-.-.-.-.-.-.-.-.-.-.-.-.-.-.-.-
WIP, more Troubleshooting coming
links
https://linuxmusicians.com/viewtopic.php?t=19947
https://wiki.linuxaudio.org/wiki/list_of_jack_frame_period_settings_ideal_for_usb_interface