Experimenting with Host-FX, ended up going with Reaktor’s Molekular once I saw it had a real-time reverse, which we desperately need in VCV. Only problem is it clicks a little bit sometimes no matter what buffer I set. Was stable enough to finish the patch. Not sure why I decided to go with bitOSC but it just seemed to work somehow as a dirty contrast to the nice clean Rings sound.
5 Likes
i love the way that metallic distortion sweeps in!
1 Like
Thanks Al! This Klirrfactory BitOSC is pretty crazy, have you tried any of this Klirr stuff yet? Its all pretty one-of-kind, and I hope the developer keeps these premium ones updated when 1.0 comes out.
I need to branch out more with some new modules 
Very cyberpunk. I really like the pad you bring in at 0:52. I know it was almost 2 months ago, but do you remember anything about that patch? I’m trying to figure out the underlying structure of pads. I get the whole slow attack, long decay for the envelope + reverb but I just can’t come up with anything that doesn’t sound like burning insects.
1 Like
Hey @dataphreak2, thanks so much! I feel like good pads can be pretty elusive to dial in sometimes and trial n error are the only way to go. In general though, I think you are on the right track with the envelope and reverb, you can even add in some vibrato or chorus. But then thicken them up with detuning & stacking differently panned and filtered voices, maybe some light audio rate modulation somewhere if you want texture, then get them to sit in the mix as one with eq and not dominate every other part while getting them to move through a variety of timbres to keep it interesting.
I isolated the pad in that Zone track from a while back by taking out the other parts and removing the paid modules. It’s two Interzone modules and they are sort of glued to each other through their “Ext” inputs and faders, I feel like this one connection took it from a pretty stale pad to the next level. Anyway, check it out if you want. 3340zone_(just pad).vcv (42.1 KB)
1 Like
Wow! Thanks for going through all that extra effort! I’m definitely going to mess with this today.
1 Like
Mmmm crunchy! Awesome.
1 Like
haha, thanks so much Jim!
1 Like
I was inspired by so many good Dexter patches lately in this group, and I felt like making a beat…
-3 voices made with BitOSC by using separate filters & effects
-Dexter for chords and another voice off the 4th operator
-Knock for a combo kick & bassline
-Hora’s PCM Drums for snare & hihats
10 Likes
That’s incredibly masterful Adi, oh my god! Everything is great in this tune, you really outdid yourself there. That bass is monstrous! Just a fantastic arrangement and sound sculpting. I love everything about it.
How do you get that volume? I mean, what do you do in terms of compression or limiting? Post-processing in a DAW or what’s your trick? Eager to learn and sadly no one has done a tutorial yet, on what can be achieved, and how, in terms of using the compressor/limiter modules we have in Rack. Maybe I just need to experiment myself…
Well done Adi!!!
2 Likes
Lars, wow thank you so much for your positive feedback, it makes me really happy you liked it! I feel like I just got lucky with a series of happy accidents. Fun stuff!
As far as the volume, I keep some decent headroom in Rack(no exact thing, just eyeball the slim NYSTHI meters so the RMS is pretty low when kicks aren’t hitting and the Peak never gets close to red), turn the gain down -3dB in OBS so it never hits the red, then after I record the video, I throw the file into Ableton, loop the loudest part, put a simple limiter on the master, set to -1dB, and turn up the gain on the limiter until I see it “limiting” just a tiny bit, any more than a little will probably not be great for dynamics. And that’s it, just keep the volume low in Rack and OBS, then some subtle limiting in a daw.
The whole post-processing thing has been trial & error for me, since I have no clue the “right” way to do things, and still not sure if I’m on the right track, since I can only use cheap headphones because of my living situation, so when it sounds good, I might just be getting lucky. I used to use Ozone8 master assistant and let it do this for me, but I canceled my rent to own subscription since I thought just basic limiting sounded better than what Ozone was doing. And yeah we need a tutorial for this for sure! Someone that can do patches with drums or ones without would be amazing…
Have a good one Lars and thanks again!
3 Likes
Thanks for the explanation Adi. I thought it might be something like that. What do you mean when you say “loop the loudest part”?
1 Like
One more question: Do you throw the whole video file into Ableton (MP4, MOV, …) and then master on that, and then re-export in the end?
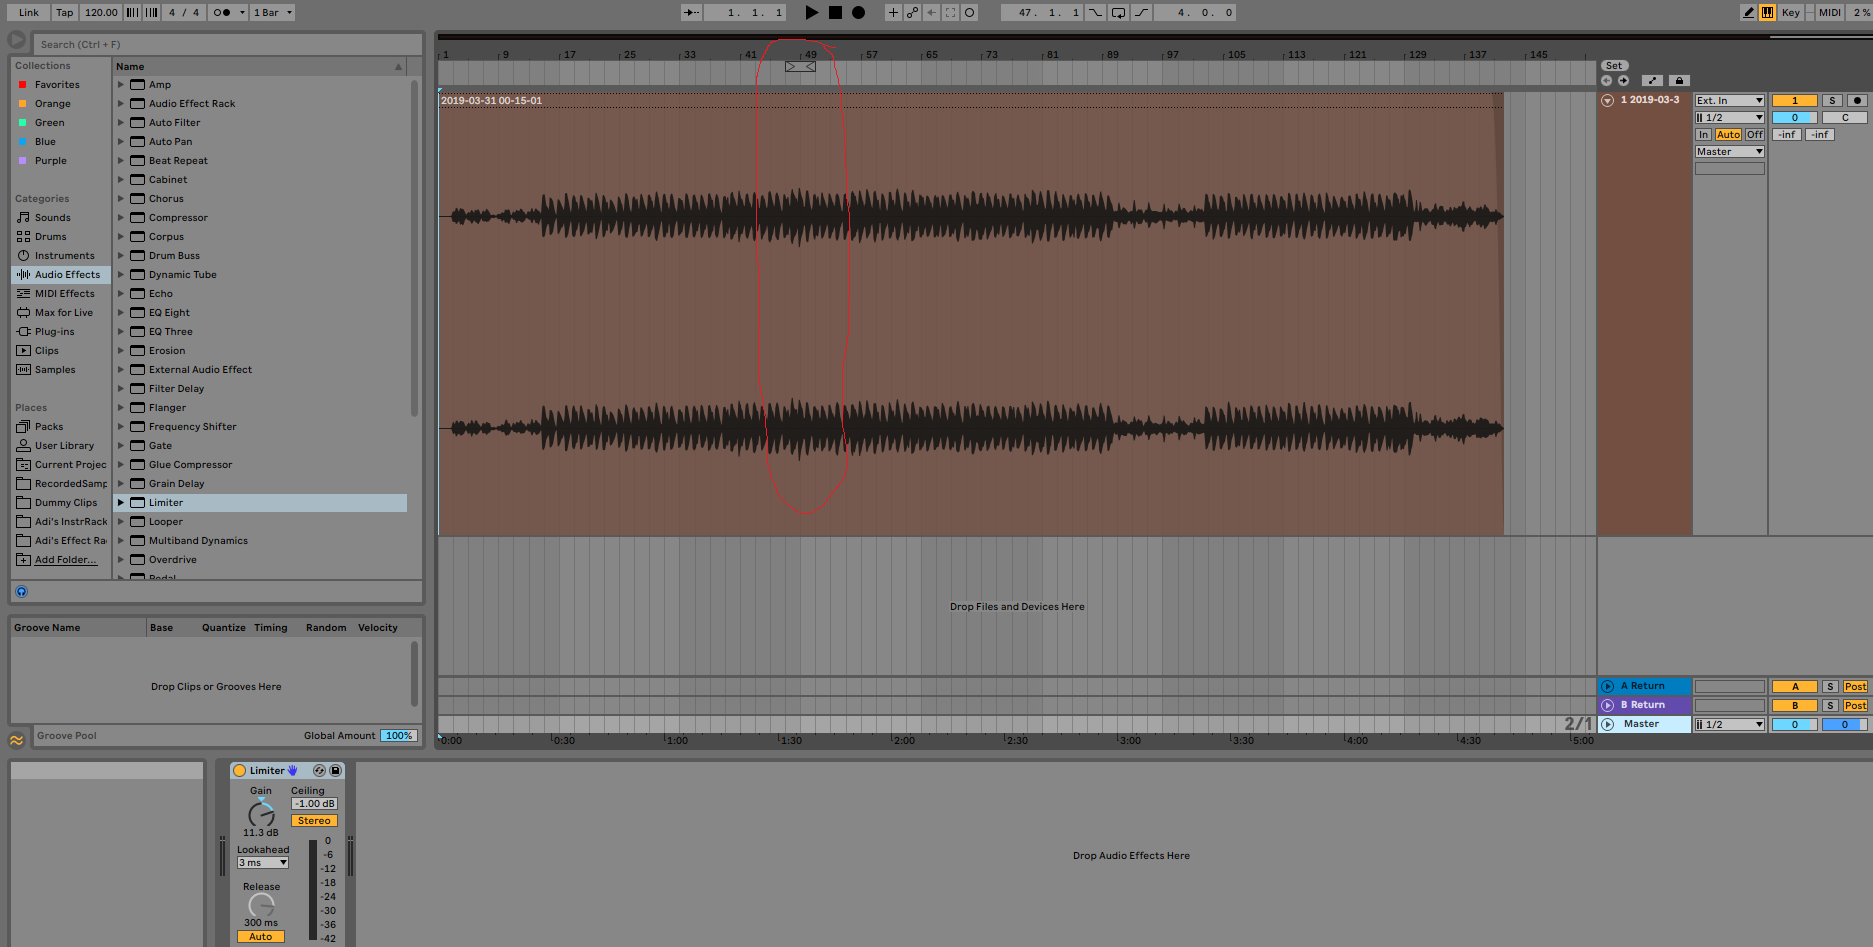
Anytime Lars! I like talking about this stuff, so much to learn! So, in Ableton, it shows a visual of the audio on the track, and I just look for the highest peaks and density overall, most likely where the patch is playing the most voices at once, and I just use this loop to dial in the limiter settings before turning the loop off and exporting. Here’s a shot… And for the file I think I record in MOV, master that, then Ableton exports to MP4 which I upload to youtube.
1 Like
Made a Dexter-Clouds pad that can go many directions, so I kept the rest simple with a Circle VCO bass line, a PCM rim shot, a PCM tambourine, and a Knock kick drum.
A cool thing to try when you want to modulate a filter cutoff knob is use Vult Freak, dial in some simple modulation like an lfo or envelope, then turn on “individual” to have separate right & left filters, then put your modulation on one side, signal delay(with some short timing) a duplicate of the same modulation for the other side, and listen to the stereo filter magic that is kind of like panning but cooler. Can even throw in some noise or audio rate modulation in the middle cv of Freak to effect both filters for some added texture once in a while.
1 Like
I think I made polyrhythms? I don’t know, but I just divided the clock by 2,3, & 5, and sent to 4 LedSeq’s that each give you 5 sets of 16 steps. Trummor2, Functional VCO, & noise–>Rings for percussion, a 3 operator FM-OP synth for an arpeggio, and Clouds for high-pitched granular stuff.
Side note: this nysthi Metaaardvark is awesome, its like having a clock synced random source, attenuverter, offset, slew limiter, and random triggers in one small module.
6 Likes

Part 2 of my Karplus adventures. I could not figure out how to make a delay track v/oct, but Rescomb2 has a v/oct so I just went with that. The feedback knob is kind of like a decay.
Fully automated 3 voice patch, with a short burst of noise into Rescomb2 for guitar, dirty Functional VCO pw audio rate modulated bass, and a Tides2 pad driven by Rampage.
Karplus2.vcv (52.7 KB) here’s the patch if anyone wants to do something cooler with this guitar sound. I feel like someone who has the patience could sit down with Foundry and make a proper progression of notes, chords, and strumming(instead of straight random like me b/c I’m lazy and not getting any younger).
5 Likes
Nice one Adi, I like the way you did the ending. 
1 Like
Thanks so much Jim! That Chronoblob infinite loop is so cool