This is probably common knowledge already but I thought I’d post it, in case it’s helpful to someone.
The Swiss Army Knife module known as Audible Instruments::Segment Generator (aka. Mutalble Instruments::Stages) is capabable of being both the master clock and also a clock divider or multiplier in your patches, all in the same instance of the module. Each individual stage is capable of dividing or multipliying a clock by 1, 2, 3 or 4, and by cascading their outputs to their inputs you are able to achieve very high or low values of multiplication/division, to many different rates.
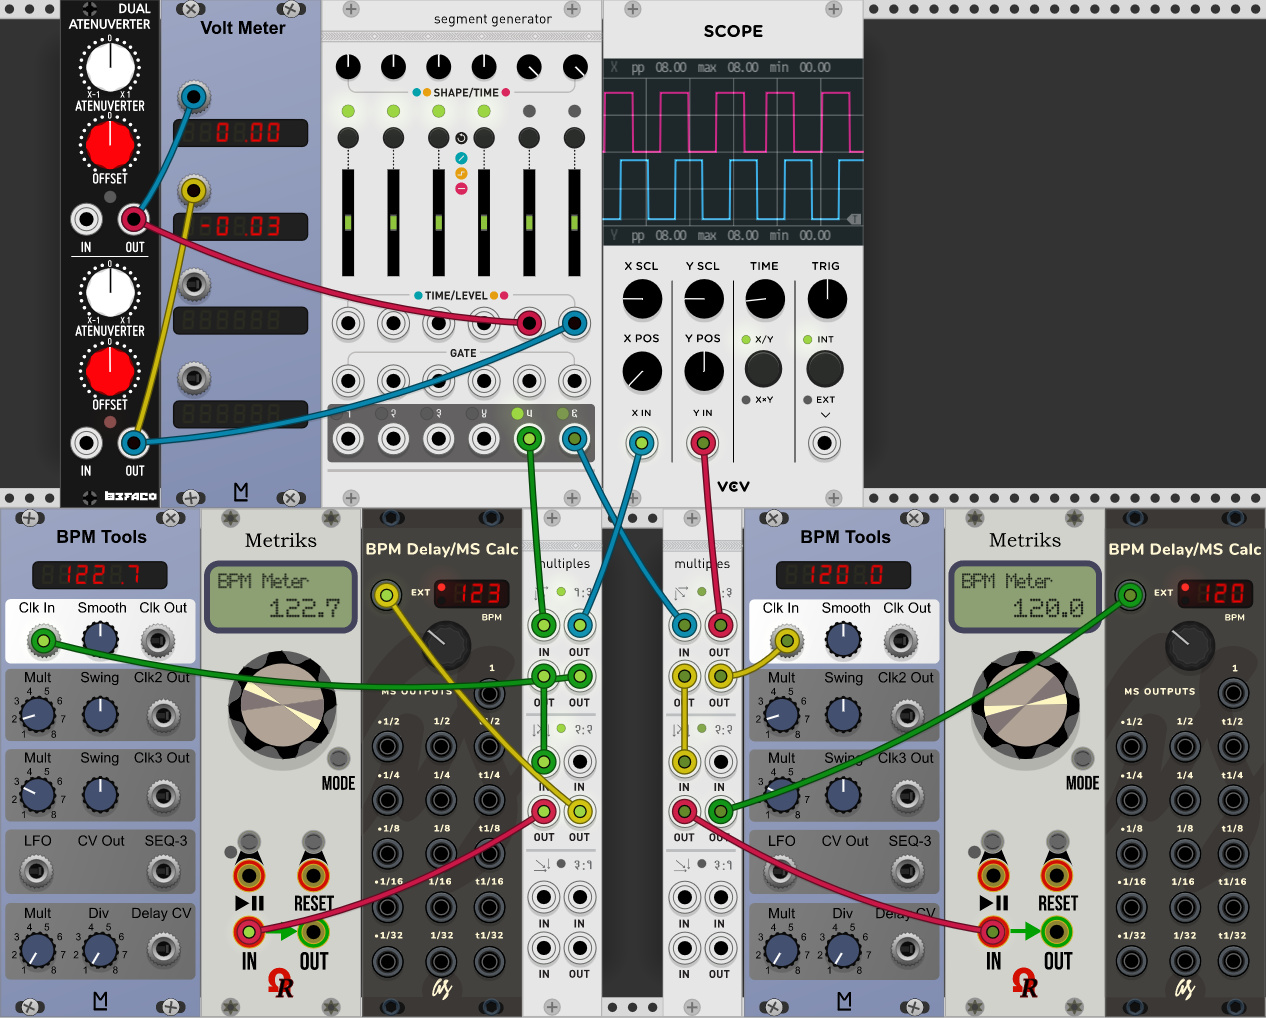
I have attached a picture with a simple example, which hopefully is somewhat illustrative. In the example, I create a masterclock of 240 BPM, then I divide it by 2 to get 120 BPM, then I divide that by 2 to get 60 BPM, and finally I multiply that by 3 to get 180 BPM.

To get square waves for all the clocks, all the involved segments have their shape knob at the top of the module, turned all the way to the right.
Counting the segments from the left:
Segment 3 acts as the master clock, and this is achieved by clicking the button twice to get the segment into Hold Mode (red light), and then clicking-and-holding the button for 2 seconds to make the segment loop. The ouput of segment 3 now gives the master clock, and the speed/rate of the clock is adjusted to 240 BPM, by pulling the slider up.
Segment 4 is used as the first clock divider, by leaving it in Ramp Mode (green light) and then again click+hold for 2 seconds to make it loop. The output of segment 3 (master clock@240 BPM) is fed to it’s input, and the output of segment 4 is now a divided clock, by pulling the slider down to divide by 2, thus giving a clock rate of 120 BPM.
Segment 5 is used as the second clock divider, by leaving it in Ramp Mode (green light) and then again click+hold for 2 seconds to make it loop. The output of segment 4 (divided clock@120 BPM) is fed to it’s input, and the output of segment 5 is now a further divided clock, by pulling the slider down to divide by 2, thus giving a clock rate of 60 BPM.
It’s worth pointing out at this point, to alleviate possible confusion, that you don’t need to chain the outputs/inputs of the clocks like I do here, to make clock dividers/multipliers work. You can feed them with any clock. I am chaining/cascading them in my example to illustrate the feasability of tying the divisions to a common clock, and achieving many different divisions/multiplications of that clock, up to very high or low rates, because the effect is accumulated.
Finally, segment 6 is now used as a clock multiplier, by again leaving it in Ramp Mode (green light) and then again click+hold for 2 seconds to make it loop. The output of segment 5 (divided clock@60 BPM) is fed to it’s input, and the output of segment 6 is now a multiplied clock, by pulling the slider up to multiply by 3, thus giving a clock rate of 180 BPM.
As a little bonus info, it might be worth mentioning that you can also adjust both the duty cycle (pulse width) and the amplitude of a clock, by using an additional segment. Put the segment in Hold Mode (red light) but not looping, and feed the clock to it’s input. The amplitude can now be adjusted by using the slider, and the duty cycle can be adjusted from trigger (slim width) to max-width by using the shape knob. Using a scope during the trimming is a good idea.
I hope this was somewhat illustrative and usefull to someone. Using the Segment Generator for clocks, dividers and multipliers is just one of the many uses of this wonderfully crazy module, which has a bit of a learning curve. I recommend watching Omri Cohen’s nice tutorial on the module, or DivKid’s video of Stages if you want to go all-in ![]()