Hi, all
Not a performance this time, but some of you might find this useful. I’ve finished setting up the latest version of my VCV template for use with my hybrid system. Some of the goals I had with this new configuration were to really nail the clocking and latency compensation issues when combining hardware and software, have a go-to set of utilities for the modular hardware, tweak some of my MIDI controller mapping, and just generally try to make it faster and easier to get rolling when starting a new patch. This is used for both studio work as well as live jams and streams. For those who don’t care, feel free to move on to some of the cool patch videos, for the rest of you… this might be a little long. Apologies in advance.
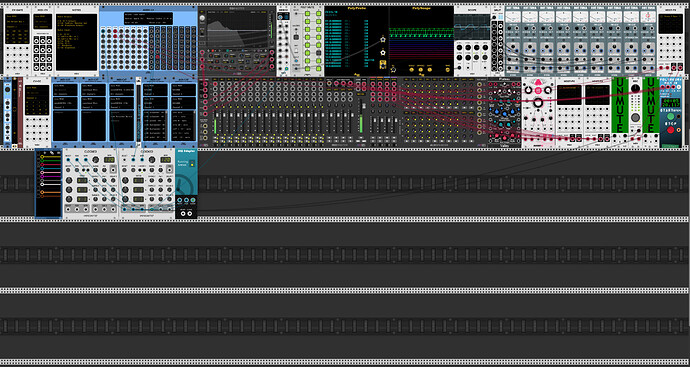
This whole template and system revolves around three core components- MindMeld modules for the mixing core of the software and hardware components, an Expert Sleepers ES-9 audio interface, and an ALM Busy Circuits Pamela’s New Workout for clocking everything (and other things, of course). I’m going to skip some of the details related to some of the MM config- it’s pretty standard for lots of us, complete with FX routing and such (thanks for the inspiration, Omri Cohen!). The notable thing here is that this is using two instances of Stoermelder MIDI-CAT to allow two different presets of a BCR2000 controller to control 16 channels and all of the aux sends of the MM using two different presets on the controller. This is done using two different presets in the BCR to essentially switch between two “layers”, 1-8 and 9-16. This uses two different MIDI channels on the BCR and a bit of tweaky configuration to make it work. And it works quite well. The only minor thing that I’m missing here is a way to map the MM LPF to a CC. The response of LPF in the EQMaster isn’t what I’m looking for for my application, so I will likely add Vult Tangents on all of the inserts for this application. That worked great for the last stream I did, but it does add up to a ton of modules and cabling.
The top row of the template is mainly aimed at the utilities for the hardware rack. This is all pre-patched from the inputs on the ES-9 so as things are brought into VCV, I can see spectrum (in EQMaster), voltage and note in PolyProbe, waveforms in the two scopes, and a tuner for 9 channels. This is hugely helpful in quickly seeing what’s going on in the hardware. To make it a bit more manageable, there is a Count Modula Poly Mute to allow the switching on and off of the channels to the utility chain. The two scopes are there because they are both great scopes, but each has some strengths and some weaknesses. So they are both there. This is great for analysis and quickly spotting any weirdness or things that need to be adjusted in the hardware. Each of my main audio channels has a dedicated feed to the chain, plus one extra as a “probe” that I can patch into any random thing in the rack to look at specific points (this is the channel 14 connection and 9th Hot Tuna). There are two extra channels for bringing in VCV signals if I need to look at or align anything between software and hardware signals.
I should note that this is running on a Mac and as such, I am able to create Aggregate Audio Devices. In this case, the audio interface is an aggregate of a Focusrite Saffire Pro24, the ES-9, and Soundflower IO. I have tried Blackhole and, despite being more modern, it has not worked as well for me as Soundflower. This is what is populating the Audio-64 module, and it’s set up this way to be able to send audio directly to Logic or Ableton if I decide to (there is the Mac IAC driver to move MIDI between the applications already in place as well)
There is a small recording section with the VCV Rec module and the Nysthi Polyrec. This is obviously to quickly capture jams and multitrack recordings for later mixing. The only thing to really note here is the Mute buttons that are essentially working as recording arm buttons to interrupt the run gate from the Clocked module when I hit run on the hardware. A simple thing, but I like having it very obvious if I’m about to record a ton of .WAV files (and turn it off easily).
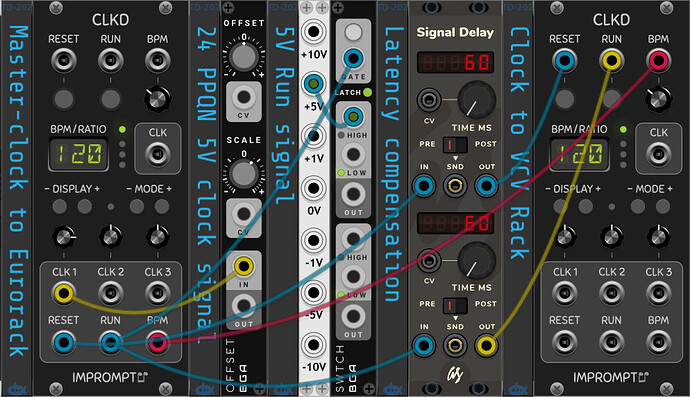
The last note is really about clocking and latency. After mucking around with lots and lots of different strategies for managing all of this, I ultimately wound up doing all of the clocking externally- the Pamela’s New Workout is the master clock for all of the hardware and in VCV, Impromptu Clocked is slaved to that. To be sure, there are some tradeoffs here, but this wound up working far and away the best for me for a few reasons. First, there is the weirdness of how clocking and resets are handled in different pieces of hardware. I’ve found that my system is much more stable and consistent when running everything from Pam using buffered mults and using the reset pulses from Pam. When running Clocked out of VCV as the master for hardware, I had to do some rather complex things to manage all of this and that wound up taking up precious ES-9 outputs. There’s also a very satisfying clicky button to start and stop things on the module ![]() . The second major reason to do this is latency compensation. When running Clocked as the master for the whole system, I needed to have a massive bank of signal delays to offset all of the internal VCV voices to align with the hardware. By moving the master clock to the hardware, I no longer need to do this. Because the clock signal has the same latency as the audio and modulation signals from the hardware, anything in VCV that is using that clock is already offset. I will need to add compensation for anything that isn’t tied to a clock, but that is fairly rare for what I do (if it’s not sequenced, it does not need to be tightly synced in my case). There are two Clocked modules here to manage the internal bits with dividing and multiplying clocks, adding swing, etc. because they are just great modules for what I do. I’v also added the RCM Seq Adapter to manage that annoying issue of sequencers skipping the first step (this is a great utility module for those who haven’t tried to use it).
. The second major reason to do this is latency compensation. When running Clocked as the master for the whole system, I needed to have a massive bank of signal delays to offset all of the internal VCV voices to align with the hardware. By moving the master clock to the hardware, I no longer need to do this. Because the clock signal has the same latency as the audio and modulation signals from the hardware, anything in VCV that is using that clock is already offset. I will need to add compensation for anything that isn’t tied to a clock, but that is fairly rare for what I do (if it’s not sequenced, it does not need to be tightly synced in my case). There are two Clocked modules here to manage the internal bits with dividing and multiplying clocks, adding swing, etc. because they are just great modules for what I do. I’v also added the RCM Seq Adapter to manage that annoying issue of sequencers skipping the first step (this is a great utility module for those who haven’t tried to use it).
That’s basically it. As I say, hopefully this gives others who are trying to set up a hybrid system some ideas for ways they might want to build up a template. mHappy to anser any questions anybody has, and of course, if there are any ideas on ways to improve this, I’m all ears to those as well.
Cheers


