Bringing unless_modules back to Rack v1!
Piong and Mr.Chainkov is here and there is a fresh one as well!
What started as a joke about concentric knobs turned into…
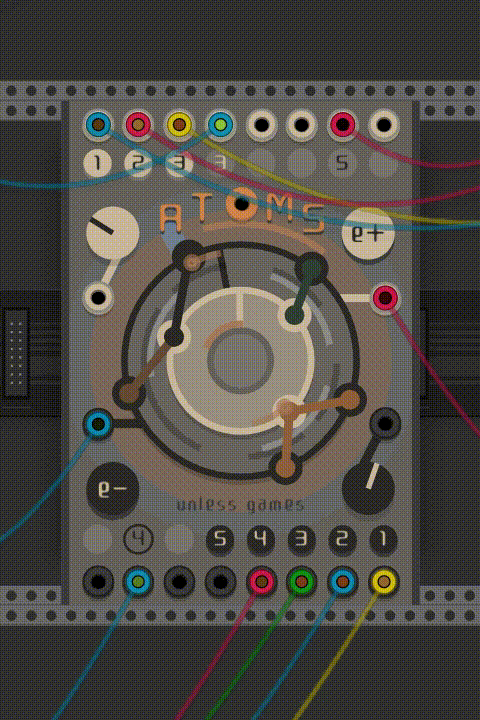
ATOMS
it might still be a joke but it is also an adjustable rotating octa-switch.
below I paste the manual I have so far…
The module works as a complex switch, it channels inputs into outputs, both of which are placed on two rotating layers and connected if they are close enough to each other based on their individual ranges (shown as arcs between them). The central knobs can be used to rotate layers and to adjust channels on them. You can toggle between adjusting ranges or positions (the latter mode shows a ring around the edge of the two layers). To adjust electrons you need to drag them like knobs.
There are four modes which you can selected by clicking letters on the “ATOMS” title. All modes except Mixer connects only one input to any output.
A ttack, Anti-pop or Audio
This mode applies a short anti-pop fade attack to counter pops when switching between connections.
T riggers
This mode is primarly for mixing trigger or gate signals, it can produce pops when used for audio. It treats unplugged inputs as 10V gates for creating a sort of gate sequencer.
O
M ixer
Mixes any input that is within range and also sets their volume accordingly, this can be used as a circular spatial mixer for example, or in cases when you dont want sharp cuts between switches to occur. It has the highest cpu usage out of all the modes!
S equencer or Sample
To be used as a sequencer or a sample&hold thing. Simple as Trigger mode but instead of dropping back to zero when a connection is lost, outputs stay on the last value that came from an input.
Unused inputs can be used to modulate individual positions or ranges, to select these you need to assign the port to an electron by dragging to it from the port’s button. You can assign to mod positions or ranges like this, it depends on which mode you are when assigning. Unused outputs can output things like distance to pair in the 0-10V range but you can also switch between input or output port with right-clicking their button.
The e- and e+ buttons equalize input or output layers, right-clicking adds or removes a snapshot of the position/range configuration which can be selected by the smallest knob in the center.
In the right-click menu you can choose to switch to audio-rate pairing which you should only do if you want to modulate positions or layers at audio rate as it uses a lot more cpu!
! alpha version ! might contain bugs
Disclaimer : the Bohr model might look funky but this module (and the model) is inaccurate in representing the real world. Do not use this as a tool for understanding physics unless you are making study-beats with it.
Get it from the Plugin Manager
thanks to the build team!